Friday, December 21, 2012

bathroom barn door

I posted these pictures on Facebook, but never really talked about it.  This barn door to our bathroom was an idea that started very early in the process of designing our house.
 
Which, by the way, if you plan on remodeling a house that you just bought... you pretty much have to have some ideas before even knowing which house you are going to buy, because the process goes so fast!  We knew we wanted an old antique barn door somewhere, but never thought we would have this great opportunity for one.
 
Our bathroom door is in the smack middle of a side wall to our bedroom.  My little head sleeps about 4 feet away from that wall.  And the ceiling is vaulted, so its a perfect place for a statment piece.
 
David, the Husband, welds.  He learned from his dear old dad at a young age and has made us many a fine item with his skills.  i.e. planters at the old house, and some other things that don't come to mind at the moment.
 
We  really like this type of hardware.  www.barndoorhardware.com  I have used it a couple of times in commercial designs for some of my work projects.  But the price tag is a little scary.  About $500 for something that we needed.  So... David just made it himself. 
 
At first I didn't want him to, afraid that the R&D behind thhe $500 price tag was probably justified and he just didn't have that time and knowledge to deal with the trial and error of it all.  But as most times happens, Husband came through with flying colors.  I shouldn't be surprised anymore by his Renaissance man qualities, but it is always a nice ending. 
 
 
Husband hanging the door.
 

steel hardware

 
And then we needed to frost the glass because it is our bathroom after all.  So, David found this for me at Home Depot.  It is a stick on film that needs very little prep/set up.


Spray the glass with some water.


Take your pre-cut sheet (measure your window before, and cut with an exacto) and remove the backer.


place it on the window pane/glass starting at the top, let it fall and adhere


take a credit card or something like that to spread the water out from under the film to the edges.


and wipe away the excess water. 
You can see the transparency difference.  Its awesome!


Now we  need to work on some acoustical sound masking issues :)

Sunday, December 2, 2012

tree branch turned wall art


This was an idea of my mom's.  We needed something over our guest bed.  We live on a lot with 100+ trees.  So, what better way to decorate than bringing in the nature.  


Found the perfect branch.  


We also found the most perfect adornments.  White porcelain flowers at Back Home.  My mom's favorite home decor store.  And then we found some crocheted flowers in yellow and grey ;) as well.  


And there you go!  Its coming together.


make a statement... wall.

This is one of my latest mini projects.  I'm happy to say they are all mini projects now.
No more total house makeovers.

A statement wall for our entry.  I toyed with different ideas, but knew I wanted a big letter and to use these antique mexican nail heads we got at Pieces of the Past.  (The same place we bought our antique door that now leads to our master bathroom.)


I use my computer and graphic software programs for pretty much EVERYTHING that I create.  From stationary, painted windows, statement walls, crafty things.


So, i started with this, AutoCAD.  (I used my graphic program, Adobe Illustrator, to get the W.  And then exported it to a .dwg autocad file.  You could also use a grid system and have your letter blown up super huge on large scale paper, etc.  This cost me no $ at all, and I'm a really impatient person, so anything that I can create/come up with at home and just DO is right up my alley.)

Then we started plotting out points on our wall.  Thanks to my bestie Morgan for helping me out!


To get the curves, I printed out those sections on 8.5x11 paper on our home printer and taped them on the wall in conjunction with the adjacent straight lines.

Another big item of discussion for any accent paint on a wall is how to get the best line with the taping off process.  I had heard of a technique where you paint the original paint color of the wall FIRST.  To basically seal the edge between the wall and the tape.  


Then, you paint your color.  And... IT WORKS BEAUTIFULLY!!!


Such crisp clean lines!

And, the finished product!


Happy Holidays!  
-katie, H&H

Saturday, October 27, 2012

tutorial - hand painted windows!

I have a little Etsy store called Edith Kelly Kate.

I used to sell vintage windows with hand-painted graphics on them.


But, that got to be a little hard/time-consuming.  I loved doing it, but the shipping was a monster.  The boxes we had to use were HUGE.  And these were windows, with GLASS shipping all over the U.S.  I have shipped to Georgia, a lot to Louisiana, the state of Washington and even... CHINA!  I couldn't believe it, and it got there without breaking!  But that was the hard part.  In order for these old 100 yr old windows not to break during the treacherous process of  shipping I had to practically create a mini UPS store in our house/garage.  I had bulk stock of packing peanuts, styrofoam stiffener blocks, and bubble wrap.  My husband David was SO helpful every Sunday at 10pm helping me get these things ready for a trip to UPS/FedEx the next morning.  But it got old, and there were more important things in my life.

So, I took all my window listings off of my Etsy store, and instead created new items that were more along the lines of what I really love to do.  Graphic design with text/typography.

However, I still receive SO many requests for the windows, that its overwhelming and I feel HORRIBLE that I don't make them anymore.  But they are SO easy to do.  So I created a tutorial on how to make them.  It gets a little wordy... (as my dear friends know I can do well) but I just want to make sure it makes sense!

So, click the link below and share for anyone looking for a great, DIY project and personal piece of art!

Sunday, October 14, 2012

necessities, kitty door.

David and I have cats.  I grew up with cats, so did David.  When we first moved in together, this was one of the first things we did.  We half-rescued two little calicos.  We got them at 4 weeks old, which looking back was a bad thing.  But the owner of the momma cat said it would be fine.  So, we nursed them with a bottle for the first few days.  Reba ate the nipple off of one of the bottles, I thought she would die that night because it was going to get lodged in her intestine, etc. This is what they looked like when they were babies. 

first day home.

first day home.  babies.

reba

dolly


Sorry, just had to share.  You're welcome.

The downside to cats is the wonderful thing called the litter box.  Moving into the new house has allowed us to create some really great, custom spaces for how our specific life works.  To deal with this detail, we made a kitty door.

one an only picture I'll show of the litter box.  Our current set up.  Not ideal.

the solution.

location.  This wall adjoins the utility room with the garage.  The idea is that we can eventually put the box and the foo out there... and they can come and go as they please so its not in my business.

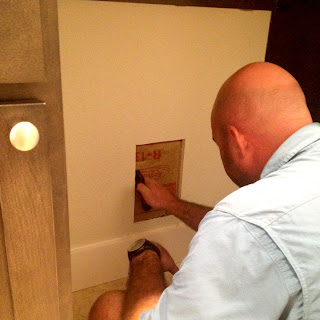
husband cutting the drywall.

cutting the insulation

water pipes. problem.

done. (david eventually move the door down the ground level, to avoid the pipes
and to make it easier for them to get in and out.
For the past two weeks we've had the magnetic flap doors taped open.  They know its there, they can see the connection of the next space and they use it.  Yesterday I took the tape down and they don't get it anymore.  It will take some training.  But we'll get there.  Until then.  Utility room is still cat room.

Sunday, October 7, 2012

the Birthday Tree gallery of frames.

This project has been about 3 years in the making.  It goes something like this.

When I bought my first house in February of 2009, David and I had just started dating, but we were super smitten with each other and he was so excited to help me remodel our first beautiful space together.  That summer for my birthday instead of the awkward first-dating-gift, David did something completely different, something completely David, and something completely me.  He bought me a tree to put in the front yard of my very first house.  A pretty big tree.  A Chinquapin Oak to be exact.


{Pretty big tree}
Jim and Jess are both standing in the hole they dug as they place it in.


{Birthday tree on the left.  Huge hackberry in the center of the house that will sadly eventually need to be cut down.  So, us planting the birthday tree was a move in the direction to help the house in the long run.)


So for the past 3 years of living in that house, I was thinking about this project.  I knew we would eventually move, and we wouldn't have that special gift anymore to look at every day.  I know its a tree and all, but its the Birthday tree!  It was special to us then, and still is. So, I nabbed a leaf off of the tree every month, to document its growth through the year.  I saved/pressed them and stashed them away until the perfect time.  And now is the perfect time.  

I bought the frames (12) last winter at Joanne's for super cheap at one of their huge 60% off sales.  I've kept them safe through the move and finally started painting them.  I chose, of course, a grey color that I tested/looked at in our hallway with our funky LED lights.  


I threw out all the matting that came with the frames and used some really nice paper I had (I love stationary/graphics/paper btw.) And cut it to the 8x10 size of the overall glass opening.  I love my paper cutter.


Then I wrote the month with pencil at the same spot on every sheet.  And placed the leaves.


I used 2 different frames, 8 of a more ornate kind, 4 of a more straight kind.  Which is why there is a little difference in the frames, but I think it creates interest and some movement. 


Thats it!  I love it in our hallway and its one more thing that is meaningful and makes our house a home!

Monday, October 1, 2012

drumroll... backsplash.

And here it is.  The backsplash.  Installed Thursday, finally grouted today.  Our kitchen is almost complete.  (I need a wood panel above my sink so that maple color doesn't show...)


[daltile white subway with grey grout and accents of
oceanside glass tile in tessera shadow, irridedscent 1x1 offset]

Long awaited, but worth it.  Also... one thing that is HYSTERICAL that we didn't realize with all the new renovation goings on...  When you order an induction stove top.  It means you need to have INDUCTION COOKWARE.  1/2 of our cookware we had to give to my brother b/c they didn't have a stainless steel bottom.  We finally found some non-stick induction cookware yesterday at target because we were desperate.  But it boils water in 30 seconds, so I'm good with that.  

More fun stuff to come now that we are home on the weekends again after some amazing weddings!  Shout out to my sweet friends and their amazing nuptials!

Heather + Ben
september 15, 2011
austin, texas


Kathy + Ross
september 22, 2011
breckenridge, colorado


We have been so blessed to be apart of our dear friends weddings!

Sunday, September 16, 2012

DIY: ceiling fan update

As I have said in the past, I am not a big fan of ceiling fans and how they look, but think that they serve a very important purpose.  Its just very hard to find any that are simple but slightly modern/classic.

I didn't want to buy brand new ceiling fans for our guest bedrooms, when we had some decent ones that were already here.  So, I did a little bit of DIY work on them and it was so easy!

Supplies:
existing fan
sand paper
paper towels
windex
paint (I used gray, surprise, surprise)
small foam roller (great to find the ones in which the packaging is also the paint tray!)
clean flat open working space

{Step 1}
Disassemble your fan.  Please use caution when working with electrical wiring!

{Step 2}
Take fan blade apart from the arm bracket that connects it to the motor.

{Step 3}
Lightly sand the side of the fan blade that you are painting as well as the edges.

{Step 4}
Wipe all blades clean of dust with paper towels and windex.  (Windex is the cure for everything.)

{Step 5}
Arrange the fan blades on a non stick surface.  (I used the empty thin Elfa boxes)

{Step 6}
Use your paint and roller to lightly apply 1 coat to the edges first, then the intended surface.  Let dry.  Repeat 1 more time for a total of 2 coats.


{Step 7}
Reassemble your fan blades/brackets and re-install fan.

Here is our finished fan.  The very dark gray paint (same as we used on the front door) looks so great.  Its not black... but isn't too light or dramatic.


The next idea/experiment is to try to fashion a different "globe" to the light... This could easily be done with a longer threaded rod/attachment system and a small drum shade from Target!  Eventually I will get to that.  Its not a top priority.  Getting boxes out of my house and becoming organized is the priority.

Have a great week friends!
Katie, H&H