Saturday, June 30, 2012

elfa... keeping katie organized since 1998.

I'm not going to lie.  I'm such a nerd when it comes to organizing and things having their place.  But another part of it, is that I'm lazy, and I want to make life easier if I can.  Throughout this whole remodeling process, we've been really thoughtful to make sure we had a lot of storage, and we maximized every space, niche, closet, underbed, garage space we could.

With that being said, we are getting Elfa shelving!  But Elfa is not new to me.  Oh no.  When I was 14 my mom went to the Container Store and lovingly purchased an entire wall system of Elfa shelving for my newly expanded bedroom.  With this grand gesture, I now had an entertainment center, a desk, and all kinds of shelving for that cherished high school memorabilia.

Ever since, I have loved Elfa shelving because its so versatile and you can move it around and change it to your heart's content.  What's also so awesome is that the Container Store designs it for you, creates a bill of materials, and then gives you a price... within about 30 minutes.  

The one thing I actually do not like, is this... Because Elfa shelving is so changeable/versatile, you can use it forever.  But, overtime, like anything it changed and grew to be easier to use, etc.  But that means that the parts have changed.  And the parts/pieces that we used to have don't work with the new.  But, our old Elfa stayed at the old house, and we can get all new, so here it is!

Sweet Laura at the Container Store designed this for me today. I am beyond excited.  A nerd, but excited.


Hall Closet


Guest Bedroom 1 Closet


Guest Bedroom 2 Closet


Master Bedroom Closet

This is my inspiration.  But sad to say this is just ridiculous.  No one's closet looks this good.


-katie, H&H

Thursday, June 28, 2012

building back

updates!

So, we've had a little bit of an interesting past week.  I caught a little virus called Parvo.  (Not just for dogs ;)  and my grandmother passed away.  It has been a tough week, but so joyous in our celebrations of Grandma Bertie!

On to the house.  Its been all demo up until now.  But now, we are building back, or at least doing the background work towards it.  And the one thing that makes me feel like this is a real project and I'm all grown up and have my own house with major renovations is this... 


Yes, it is a Port-a-potty!  But this is necessary because we have no working toilets.  This means that subcontractors ("workermen" as I referred to them as a kid) are on sight for most of the day and that is a legit project.  It just screams construction!

Here are some other photos of the work.


Electricians hard at work in the kitchen.  Recessed cans.


Living room ceiling.  Scraped ceilings, and blocking material to go back and be able to clad the exposed beams with natural wood.


Up close on the building out of the fireplace.  Goodbye brick, hellow stucco and a floating wall mounted flat panel tv and... no wires!  Once the J-box's are up I'll take a picture and explain!  One thing you HAVE to do if you are re-doing a fireplace.


This was the LED "recessed can" that we tried out... Its a little "cold" and way brighter looking than a typical recessed can due to the fact that the diffuser/bulb isn't recessed...  


These are the monsters we are installing instead.  Traditional recessed cans.  looks very sleek on the outside, but inside the ceiling, monster.


David measuring out the locations of the recessed can in our new kitchen!  


My new laundry room!  The wall on the left will continue to the end of the far wall.  Galley style laundry room, stacked W/D with clothes rack and lots of storage!  Cabinets come in 3 weeks!


Sad day when I was told we cannot lower the window seat.  The window depends on the height of those studs exposed.  Thanks to my man for ripping out that wall so we could see if it was possible.


New bathroom layout.  We widened the toilet "room" (no door) because it was pretty funny seeing David sitting in that little space.  But, this means we had to move the toilet drain over.  (In commercial design, you don't do this unless you have ADA issues and you're violating code.)  Here at the Walker house, Papa Walker (David's dad HD) and boy Walker have NO problem breaking into concrete and moving over a drain.  We have a trained pipe fitter and construction manager.  Why not?!!


Before


After


This is a very fun part!  This is a picture of our waterproofing membrane that was built/poured a couple of days ago and is now being tested for leaks overnight.  This hard shell like membrane made of fiberglass is continuous from the floor of the shower to the walls about 10".  We will never have leaks or mold within the walls with this walk in shower.


By the way, we also had to move the shower drain.  Here you can see it in its original location, for a tub.  But where they saw-cut and chipped out is closer to the center of the standing/walk-in shower and will help with proper drainage.


One other item in the master bathroom.  We now have 2 vanity sinks!  Instead of 1.  So happy, much needed, everyone should make this happen!


I finally went to the house after not going for several days and the back wall (where the hall closet and wall mounted oven/microwave used to be) is now filled in!  It already seems so much bigger.


Hallway with recessed cans down the middle.


An example of bad wiring.  David found this during the electrician's work the other day.  This is super bad and not safe.  If you are going to join two pieces of electrical wire, they have to be enclosed in a junction box and secured to the structure.

And thats it for now.  Upcoming days will include:

finishing up drywall and scraping over existing texture to create new
paint colors picked
new texture on walls
doors and casings

This weekend I get to go to Container Store and design our closets!  I need to get samples of paint and make a freaking decision already.  And, finalize our new appliances.  Front loading washer & dryer and french door refrigerator here we come!

thanks for reading!
katie & david, H&H

Wednesday, June 20, 2012

The plan...

Demo is still under-way. But I wanted to share some before pictures as well as our ideas we have for making this the most amazing house ever.

Update from David: ceilings were scraped today. Framer comes tomorrow to start laying out any new walls. There are a couple of changes. Electrician and plumber come soon to assess.

Katie update: I just bought our first light fixtures yesterday!


West Elm Glass Jar Penants
3 of these beauties for the peninsula at the kitchen.


West Elm short drum pendant
and 1 of these for over our dining table


Here are the before pictures:


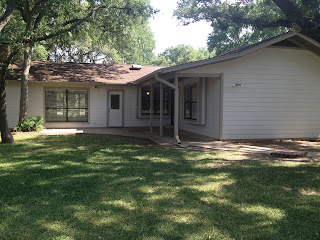
Back of the house.


Back of the house... the chain link fence will be replaced, eventually, with a wooden privacy fence.


Entry, that little pony wall is now gone. (Item #3 on the plans below) We will get a new door to replace the "speakeasy" one with the mini door at eye level, as well as the blinds and the 2nd glass door on the exterior.

Hallway, all tile, recessed can lights.


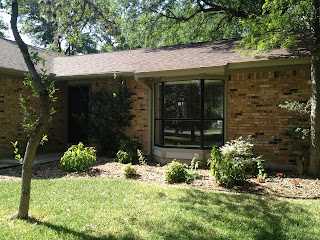
Front landscaping. A little rough at the moment. But a good base to start with.


Guest bathroom. Layout will stay the same... all new cabinetry, toilet, tile mirror lighting.


Guest bedroom 1. Updated ceiling fan... but its just not for me.


Guest house/studio/shop.


Guest bedroom 3/studio for me!


Guest bedroom bath. That sink unit will have to go. Unfortunately there is a window smack where a mirror should be.


Dining area into living room. That wall (backs up to entry) will be getting shorter on the right side.


Hallway into dining. There is my little dining booth/banquette. I still don't know if this is do-able. But we'll see when the framer gets here.

See Item #5 on the plans below.


Dining into Kitchen. All new cabinetry. Peninsula idea stays, but gets taken back down to one height countertop with barstools. We wanted to pop up the ceiling but there is a ceiling joist in the exact middle of that, so we will just make it solid and put recessed cans in with some pendants.

See item #1 on plans below for the change.


Dining into Kitchen. The whole arrangement of this left side will change.

See item #1 on plans below for the change.


All new travertine tile, granite countertops and glass tile backsplash.

See item #1 on plans below for the change.


I am so excited about expanding the laundry room! It will be almost 3x the size it is now with all kinds of storage.

See item #2 below for the change.


Living room. David will be creating a new structure around the fireplace and then will stucco it. (Item #4 on the plans below) With stone/leuders at the hearth. I think we are going to try to strip the beams of their paint. The back wall is paneling... which we will keep. Its a nice texture and paint goes a long way.


Living looking into dining and entry.


Living looking toward entry.


Master bathroom. Completely changing the layout. Most functions are staying the general vicinity, but there will be a new door location, with a flip of that tall cabinet and a new entry for the toilet where that tall cabinet is now.

Item #6 on the plans below.


The tub was removed. Walk-in shower to come.

Item #6 on the plans below.


Master bedroom. Love the beams. Wood floors will be added.


The shop. David's dream. Backs up to the Guest bedroom/Studio.


And, here are the plans for how its all changing.


BEFORE


AFTER

Sunday, June 17, 2012

Ceiling fans... Love/Hate Relationship.

This may be a completely small detail for some people, but to me... its very bothersome.  I have a love/hate relationship with ceiling fans.  
1.) They are needed.  I don't care what you say about how great your AC system is... at night when you have another human being laying next to you or on a hot summer day, you just need a ceiling fan.  

2.) Ceiling fans are the #1 product least spent on Research & Development with companies... (in my opinion).  They are all so ugly.  And when you find one that looks great, simple, it doesn't give the light output needed to fill a room properly with light.

3.  Ceiling fans are way to over-designed.  (I'm contradicting #2, oh well) I just don't understand why you have to put all these crazy lines and scrolls and craziness on it.  Its a functional item that most people don't even notice.  So just make it functional and simple. 
(I feel this way on many products.  I may share more later.)

This is my nightmare.  The ceiling showroom at Lights Fantastic.  


So, here I will break down my predicament.  


MonteCarlo Sleek 52" 

This is similar to the fan we had at our last house.  When we bought it I loved it.  Thought it looked so great and fit with the house perfectly.
PROBLEM:  The light only shines down.   There isn't any light that shines up to reflect off of our beautiful white ceilings to help with "ambient" light.  (The light that seems as if it comes from no direct source because it is shining off of the highly reflective color of white and then shining back down onto your space.)

hampton bay marris 44"
Typically, ceiling fans like this do well reflecting light.  But has you may have guessed, this doesn't fit our style.


Kichler Hendrik - 52"
This one would be perfect if it had some lights up in that metal piece at the top.  Nothing fancy.

CraftMade Midor 56"
This one actually is exactly what I'm taking about... light at bottom, light at top.  But why does the light at the top have to be so freaking big!?!?  Again, over-designed.


Kichler Olympia - 60"
Same as above, over-designed with the detail and the massive light shell up top.

MonteCarlo Apex 52"
This one is a more modern take on the typical fan with the individual globes.  But its just too fancy for me.


Structures - 52"
This one I think might actually help with the reflective issue.  Although it doesn't have any lights shining directly up... its globe at the bottom comes off the edge of the motor housing and might... might shine a good amount up to the ceiling.  But, look at those connector pieces for the blades!  Why?  I might have to call and ask about this one.  (It comes in different color blades)


MonteCarlo Solaire 52"
And then there is this one, very similar to the one above, same probability with the reflective globe... and its nice and simple and bronze/black.  I'm okay with this one.  But I will have to call about it and/or see it in person.

Happy Sunday and Father's Day!  Demo Day 2 is under way!

- Katie & David, H&H